Saturday, September 14, 2013

New and Improved Custom Tags List!

After posting my favorite Custom Tag list on 8/17/2013, I made a few changes:
  • Added a "Definition" tag that looks like a writing pen.
  • Modified the "Decision" tag so that it includes a check box.
  • Changed the "Escalation" tag.
  • Changed the order of several tags.
Adding the check box functionality to the Decision tag allows you to 1) identify what decision needs to be made, and 2) flag when the decision is made.  My recommendation is to indent the line below the decision tag statement with the decision maker and actual description made.

I replaced the image in the original 8/17/2013 post with an image of the new tags. Take a look: http://masteringonenote.blogspot.com/2013/08/make-your-tags-work-for-you.html.

Please comment on the value of this post, especially if you have ideas for improvement.

Sunday, September 8, 2013

Calculate agenda topic times in the blink of an eye!

This post shows you how to calculate start times of agenda topic in the blink of an eye.

In my prior posts, I shared practices for creating and organizing your notebooks, creating custom tags, designing an effective agenda layout, and creating agendas quickly. I also promised to share tips and tricks for improving productivity in OneNote; this post is one instance of making good on that promise.

As a prolific scribe of meetings, I find that agenda topics come and go, and often the sequence of topics change as the meeting approaches. This is especially true with less formal and ad-hoc meetings. The sequence of topics change for multiple reasons:  to improve the flow of a meeting, to accommodate the availability of resources, etc.

If not well managed, the changes can reek havoc on the agenda and the success of the meeting. Managing this change effectively often requires the facilitator to "jump through hoops". The agenda has to be revised and ready to guide the meeting.

In response to this challenge, I created a simple MS-Excel tool to help me make the change effectively and timely. I keep the tool handy. (i.e., I create a shortcut to the tool and dock it on my task bar so that it's always a single click away. While creating my agenda in OneNote, I can easily launch the tool, press a button, and paste the results; yep, it's that easy!)  See Figure 1, below.

Let me explain how the tool works:
  1. From within OneNote, select and copy the agenda table as shown in Figure 1.

  2. Figure 1
    • Notice the times are not populated.
  3. Open my Excel tool, and click the button as shown in Figure 2.
    Figure 2
    • The button runs a macro which calculates the start times and pastes the results to the clipboard from which you can paste it back into OneNote; it's really just a push of a button!
  4. Switch back to OneNote and paste the results.  In Figure 3, below, the Start times that were added to the agenda are highlighted yellow for demonstration purposes only; they are not highlighted in the actual agenda.
    Figure 3
    • Tip #1: Press <Alt>+<Tab> to switch back to OneNote.
    • Tip #2: Press <Ctrl>+V to paste the results back into OneNote.
    • You may want to widen the Topic column and re-bold the headings after this step.
This process takes about 30 seconds to complete, and is never wrong! Of course, this is a very simple example agenda. As the number of Topics increases and the Duration times vary, refreshing the Start time column becomes more time consuming and prone to errors, unless you have a tool to do it for you.

If your agenda changes, the good news is that OneNote allows you to easily drag rows up and down in a table in order to change their sequence. In order to do that, just hover to the left of the row, and you'll see a "handle" that you can click. When you click the handle, the system selects the entire row, and allows you to move it up or down. Of course when you do that, the Start time of that Topic changes. Don't worry, my tool will fix the issue.  Just run it again, and you're done.

I write these posts so that others can benefit from my learning. If you find it helpful, I'd sure appreciate a brief note telling me so. And, if you'd like a copy of my Excel Tool, click Google+ on this post and send me a private message to request a copy.

Saturday, August 31, 2013

How to create an agenda quickly

In my last post, I shared an agenda layout that has proven effective for nearly any working meeting.  In this post, I'll show you how to create that agenda quickly from MS-Outlook.

OneNote and MS-Outlook are well integrated.  In order to launch OneNote and create a page from an MS-Outlook event, select (single click) an MS-Outlook event on your calendar; then, select the OneNote icon.  Figure 1, below, is a screen clip of an outlook calendar on August 25, 2013.  I used a red pen to circle the OneNote icon and a meeting event titled "My Sample Meeting".
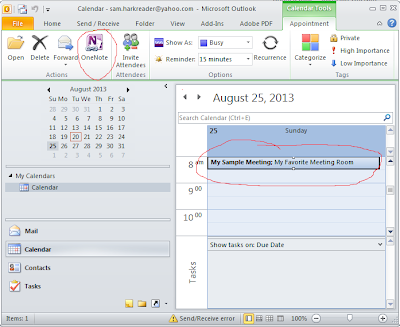
Figure 1
After you click the OneNote icon, the system will ask you where you want to store the page.  As a review, I will remind you that Pages are stored in Sections, so basically, the system is asking in which section do you want to store the page.  If you don't already have your notebook organized, just put it in any section for now. You can easily move the page to another section later by dragging and dropping into another section.  Once you've done this, the system will respond with something like the following.

Figure 2

You may notice that the Attendee names are in a string, delimited by semi-colons.  You can manually convert this string into a single column list by manually deleting the semi-colons and hitting the <Return> to put the next name on the next line. Afterwards, select the entire list of names and press <Ctrl>+1.  This will add a "Participant" tag to each attendee on the list.

You also need to replace the "Message" row of the header with two new rows: the "Purpose" row, and the "Desired Outcomes" row. To do this, simply edit the "Message" label to say "Purpose". Tab to the next field and type the purpose of the meeting. Tab again to add another row; there, type the ""Desired Outcome(s)" label.  Tab again to type the desired outcome(s) of the meeting.

You may have noticed that the font of the "Desired Outcome(s)" label looks a bit different from the others. I fix this with the format painter icon. (i.e., Select the "Subject" header and click the Format Painter icon from the top left of the menu bar; then select the "Desired Outcomes" label.  Doing so, will cause the "Desired Outcome(s)" label to match the "Subject" label.)

Now that you have the header of the agenda created, you can create the body.  Once you create your first Agenda table, you can easily copy to another future agenda page and edit it for the new meeting. I always leverage previous work where I can.

In order to create your first agenda table, just type the word "Agenda", and change the font to something like 16 pt. Bold Calibri as I did in figure 2, below.

You'll need to hit enter to go to the next line where you will insert the table. To insert the table, simply select the "Insert" menu item near the top of the window. From there, use the table feature to insert a table that is four columns wide and six columns tall. In the first row, type the headers to match the headers in my Agenda table ("Start", "Agenda Item", "Owner", and "Duration"). I bold my header, and I recommend you do the same.  Now fill out the table to match mine.
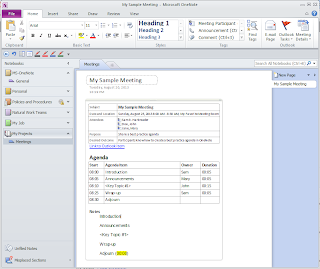
Figure 3

Now that the Agenda table is complete, let's finish with the Note section. First, let's create a heading for the Notes section. In my example above, I just bolded the default text, but you may want to make the style match the "Agenda" heading (16 pt. bold Clibri).

In the body of the Notes section, we basically want to duplicate the items in the "Agenda Items" column of the Agenda table. A simple copy paste will not work; the table formating is pasted too, and that's not what you want in the Notes section.

In order to copy and paste only the text, I'll use MS-Notepad to strip the table formatting. I'll explain how.

  1. Hover near the top border of the table, above the "Agenda Items" column until you see the down arrow.
  2. With the down arrow showing, press your right mouse button and select copy, to copy the contents of the column to your clipboard.
  3. Open MS-Notepad and paste the contents into the MS-notepad window.
  4. Delete the text that says "Agenda Items" since that's not actually an agenda topic.
  5. Copy the rest and then paste it under the Notes section on your OneNote page.

I like to put an extra line or two between each item in the Notes section so that I'm even more ready to type content when the meeting starts. In fact, I even add a tab to the line below the agenda item so that when I start typing, the content is already indented.

Remember to leverage work where you can.  If you have standing meetings, there is typically much content that can be re-used.  Consider copying parts of the page from previous meetings to the page of your current meeting, and edit only the parts that require change.  OneNote is great about allowing you to copy tables or parts of tables from one page to another.

In future posts, I'll share some productivity tools/tips to help you quickly convert the Attendee names to a single column of names, and to calculate the start time column automatically.  In future posts, I will also share practices for note taking, so stick around.

Saturday, August 24, 2013

Highly Effective Agenda

My previous blogs focused on some basic features and functionality of the OneNote application.  With what I have covered in previous posts, plus what I share in this post, you will have enough knowledge of features and functionality to get valuable results in return.  To be clear though, there are many more features still to learn, some of them very impressive and useful.

I have facilitated thousands of meetings and have poured personal time and passion into improving my meeting facilitation skills.  I have adopted practices from my mentors and I have developed practices of my own. It is my opinion that the most successful agendas include certain meeting specifications as well as agenda items, times and responsibilities to help guide the meeting.

While managing a project in 2004, I discovered OneNote. I saw opportunity to model some personal best practices and began to tweak tags, the agenda, etc. as I learned new tricks for gaining productivity and improving communication.

In Figure 1, below, I have shared my current personal best practice agenda layout. This agenda  layout is proven to be effective for nearly any kind of working meeting. I have validated these practices through thousands of meetings, including meetings within my own company, meetings for my employer, and customer project meetings on consulting engagements.

Figure 1

Of course, when you create your agenda, much of the content will need to be changed in order to meet the requirements of your meeting.  For example, you will need to change the meeting specifications in the header (i.e., the content in the Subject, Date and Location, Attendees, Purpose, and Desired Outcome blocks) to fit your meeting.  You will also need to replace the content in the Start, Owner, and Duration columns within the main body, the part titled "Agenda".

Within the Agenda Item column however, I recommend only changing the "<Key Topic #1>" item by replacing it with the actual key topic of your first key topic.  Then, insert rows for any additional key topics you need for a successful meeting.  As a best practice, however, I'd try to limit the number of <Key Topics> to no more than five (5).

In other words, I recommend that you do include "Introduction", "Announcements", "Wrap-up" and "Adjourn" exactly as they are represented in the illustration.  Adding a maximum of 5 key topics would put your agenda at 9 rows total.  Of course, there are extenuating circumstances that may justify a longer agenda, but it should be a rare occurrence in my opinion.

You may have noticed that, in the content of the Attendee block, I listed participants and added the "Participant" tag.  In my last post, I explained how to customize your tags which include creation of the "Participant" tag.

In future posts, I'll share some great tips and tricks to help you create this effective agenda so fast that you'll think twice before ever having another working meeting without one.

In some cases a completely different agenda style may be more successful. For example, in a meeting where you are pitching a proposal to a prospective customer, you may want an agenda that is integrated into a presentation, or printed as part of a formatted proposal document.  That situation typically often calls for an agenda that is printed or integrated into a presentation slide deck, both of which are outside the scope of this post. Still, this post can be used as guidance for building the agenda.

Stick with me, and I'll keep sharing, in an orderly process, tips and tricks that have taken me years to learn and assemble.

Saturday, August 17, 2013

Make Your Tags Work for You

OneNote tags are little symbols you place next to content on your pages in order to characterize your information. Tags are not just cute; they are useful.  OneNote uses tags in clever ways to help you organize and find the information you need.

With your initial installation of OneNote, you are provided a pull-down list of tags which you can find in the Tags section of the Home menu.

Tip:  If your menu bar is not expanded, you can expand it by clicking the little down arrow that appears in the upper-right corner of your OneNote window. Clicking the arrow works like a toggle to expand and collapse the menu bar.  See Figure 1, below, for an illustration of a collapsed menu, the arrow that expands the menu, an expanded menu, and the arrow that collapses the menu.

Figure 1

I prefer to keep my menu bar expanded because I have a monitor with plenty of real estate; however, if you use OneNote on a small screen, you may want to keep your menu collapsed.

The initial pull-down list of tags that come with a fresh install of OneNote does not allow me to be as productive as I can be with a more customized list of tags. Fortunately, OneNote provides the option to customize your tag list.

If you don’t already have a list of tags that are proven to work great for you, I suggest you create one right away. See Figure 2, below, for an illustration of my custom tags.

Figure 2

This set of tags should prepare you for the journey of Mastering OneNote, especially if you facilitate meetings.

In order to setup your tags like mine, I recommend you start by deleting all the tags in your current Tags list. You can delete them by selecting the “Customize Tags…” item from the pull-down list of tags in the Tags section of the Home menu; then, select the “X” to delete one item at a time until all except the last item is deleted. When you get down to the last item, simply select either the <Modify Tag…> button and modify the Display Name and Symbol to bottom tag on My Custom Tags list.

NOTE:  When you add new tags to your list (i.e., from My Custom Tags list), the new tag is inserted at the top of your list. This means if you start adding tags to you list by working from the top to bottom of my list, our lists will be in opposite order when you're done.  Create the same by starting at the bottom of my list, and adding all the other tags, one at a time, using the <New Tag…> button.  Continue until your tag list looks just like mine.

As a side note, for improved readability, I avoid using the Font Color or the Highlight Color feature.

Keep in mind that tags are like stamps. When you tag information, an instance of the tag, including its display name, are attached to that information.

NOTE:  When you tag content, the symbol is visible, but ironically, the display name is not.

The tag and the tag's display name will not change unless you delete the tag. Tagging content and then later changing the display name can cause issues when you start grouping content by tag name.  (i.e., This will result in multiple occurrences of the same symbol with different tags.)  For this reason, it is good practice to settle on a list of custom tags when you first start using OneNote.

Later, you may find that you want to tweak the tags more to fit your business/personal needs. To do that, simply select the tags you want to use, and give whatever Display Name you wish.

Overall, there are 138 tags available in OneNote 2010.  See Figure 3, below, for a screen clipping of all tags available in OneNote 2010.

Figure 3

There are two easy ways to tag your content.

  • Select any tag from the pull-down of the Tags menu; or,
  • Hold <Ctrl> key, and press a number from 1 through 9.

NOTE:  The first nine (9) tags in the Tags list, can be used with the <Ctrl> key to apply the corresponding tag. Put your most frequently used tags in the top 9 of your tags list, and don't change the order.

Use your tags to identify your content. Then, you can put your tags to work for you. You can summarize content based on your tags, to produce new useful information.

Saturday, August 10, 2013

Organizing Your Notebooks

OneNote® allows for content to be easily moved and organized.  While this is a useful feature, some users find themselves spending a lot of time reorganizing.  The need to reorganize increases due to work/life changes over time.  As we change jobs, get married, have children, buy a home, etc., the amount and type of content we need to organize changes.  As the amount and type of content changes, the way we wish to organize that content also changes.  If you have a daughter in Girl Scouts, for example, you might have a notebook specific to Girl Scouts; and, when your daughter is finished with Girl Scouts, you won't want to be burdened with looking at the notebook every time you open OneNote®.  In that case, simply close the notebook.  This will make it disappear from your OneNote® window.  Keep in mind that you can always re-open it if she decides to re-start Girl Scouts.

Finding a design that works for you can take time.  In order to save you some time, I used the Screen Clip feature of OneNote® to copy and paste a screen clipping of a sample layout from my personal computer.  (See "Sample Layout for Your Home Computer".)  I'll share some tips about using the Screen Clip in a future post.  I even opened a few of my notebooks to give you a deeper view into my life.  From the illustration, you can see that I at least have an interest in entrepreneurship, that I document my knowledge of various industries and disciplines, and that I have worked as an employee and a contractor.  I hope that by opening up a bit, I have provided you with some ideas that may help you get organized quickly.  Everybody is different, so you'll need to decide how you want to organize your own notebooks.  Get started right away so that you can start reaping the rewards of OneNote®.

Those of you who are W-2 employees, may have one computer for work (one owned by your employer) and another personal device owned by yourself.  In that case, you will have two instances of OneNote®, one on each computer.  In both cases, you may wish to have a notebook that contains personal or private content.  You have a few options for keeping your personal content synchronized.  One great option, if your IT organization will allow (and they probably will not), is to create your personal notebook on a shared location outside of your companies network (i.e,. on a service like SkyDrive, DropBox, etc.).  Another option is to manually synch those OneNote folders.  In any case, for your personal instance of OneNote®, I suggest you consider creating a book titled "Personal", with sections/section groups something like:
  • Passwords (i.e., a password protected section of pages, with one page per account/password.)
  • Emergency (i.e., a section with one page for each type of emergency:  power outage, fire, flood, death of spouse, national security emergency, etc.)
  • Travel List (i.e., a section with one page for each type of travel, including the following pages:  individual travel for work, family travel for vacation, etc.)
  • Financial Accounts (i.e., a password protected section of pages, with one page per banking institution, including key information on each page:  account numbers, and routing numbers, customer care contact information)
  • Registrations (i.e., a section of pages, with one page per personal registration of software including key information on each page:  source of software, URL for downloads, software keys, price, etc.)
  • Professional Memberships (i.e., a section of pages, with one page per organization in which each page contains key information:  organization name, member ID, etc.)
  • Personal Assets (i.e., a section of pages, with one page per asset in which each page contains key information:  Name/Description of rolling stock, make, model, serial number, photo, etc.)
Below is an image of an instance of OneNote® on my personal computer at home.

Sample Layout for Your Home Computer


Professionally, OneNote® can improve the speed at which people prepare for a meetings; it can improve the quality of your meetings minutes; and, it can improve the speed and quality in which you summarize and distribute meeting results.  There are many other professional uses of OneNote®, and below is a sample design that you can use to get started.  From there, just do what works for you.

Below is screen clipping of a simple layout for your work computer.  This is just something to get you started, but you will need to modify this to suit your needs.


Sample Layout for Your Work Computer


If you found this post useful, please comment and share my post with your friends.  Also consider subscribing to the blog so that you will be notified of future posts.

Saturday, August 3, 2013

What You Need to Know First

The key to mastering OneNote® is to first learn the parts and pieces, and how they relate to each other.  Once you understand them, and how they relate, you will be able to create your first notebook with confidence.

Of course, there is more to learn than parts and pieces, but learning these basics will allow you to get started with your first organized notebook.  Some people may wish to have a set of notebooks for personal use at home, and another set for professional use at the workplace.  In my next blog, I will offer a snapshot of organized notebooks for your personal use, and another snapshot of notebooks for work.  If your mingle your work with home, you may wish to combine the two.

While writing this blog, and sharing the draft with family, I was reminded that everyone thinks differently.  Some people conceptualize better by building the parts up to make the whole; others conceptualize better by imagining the whole and breaking it down into parts.  Because of this, I will describe it in two ways.  I will describe it from starting from the whole, working my way down to the smallest piece (a top-down approach); and I will describe it from the smallest piece, and work my way up to the whole (a bottom-up approach).  By the way, I consider this different kind of thinking just one vector of diversity, and I am a full believer that there is strength in diversity.  I plan to post about the strength in diversity in one of my blogs later this year, and I hope to catch your eye with that post too.

Below, I step through the parts using a top-down approach.
  • OneNote® contains "Notebooks".
  • Each notebook contains one or more "Sections" or "Section Groups".
  • Each section group may contain one or more sections.
  • Each section may contain "Pages" and/or "Page Groups".
  • Each page group contains one or more "Subpages".  (Subpages are actually just indented pages).
  • Each page may contain content.

For those who think equal and opposite of me, I step through the parts using a bottom-up approach.
  • Your content is stored on a "Page".
  • Pages may be indented.  (Indenting pages will form one "Page Group" with one or more "Subpages)
  • Pages (whether or not they are indented) are always stored in a "Section".
  • One or more sections are stored in either a "Section Group" or a "Notebook".
  • One or more section groups are stored in a "Notebook".
  • One or more notebooks can be created in open in your set of OneNote® notebooks.

You may be interested to know that I used OneNote®'s convenient screen clipping feature to copy and paste a screen shot so that you can follow along.  Within the illustration below, I named the parts and pieces so that they match my word descriptions above.  In other words, to one notebook, I gave the title "Notebook"; to two different sections, I gave the title "Section"; to one section group, I gave the title "Section Group"; and, so on.  As a reminder "Page", "Page Group", and "Subpage" are actually all just pages that are indented.  The reason I've called them out with these names, is that OneNote® uses these terms when it's time to print; otherwise, it's pretty irrelevant.


Illustration of the relationship between Notebook, Section Group, Section, Page Group, and Page

You probably noticed that some of the parts appear in more than one place.  For example, the left pane includes a list of all your notebooks, with a collapsible outline of section groups and sections.  In the middle section, you will see the same Section Groups and Sections along the top, which appear much like tabs in a file drawer.  On the right, you will see a list of pages within a section.  I've indented one page and titled it "Subpage" so that you can see the difference between a "Page", a "Page Group", and a "Subpage".

The names of the parts and pieces may be changed to suit your needs.  I encourage you to explore and name the parts and pieces to fit your needs, to to look for future blogs from me that will help you Master  OneNote®.  There is much more valuable stuff to come!

Please subscribe to this blog, and post a comment to share your feedback or request future topics on this subject.

Saturday, July 27, 2013

Work Smarter | Play Harder

Technology is driving us through a paradigm of mass information, towards a theoretical paradigm of mass imagination.  In this information age, our need to sift, organize, process, and retain knowledge continues to accelerate.  Thankfully, technological advances help us deal with the rapidly growing mass of content.  More connected and faster devices, a host of applications (excuse the pun), and cloud computing are some of the major game changers.  OneNote® is a great productivity application that has been around for several years, but doesn't get the attention it deserves.  Read on to see how Mastering OneNote® can help you be more productive, sleep better at night, and impress your co-workers.

OneNote® is an application found in MS-Office suites, but many licensees are simply unaware of its power, even after a brief exploration on their own (once they discover it in their MS-Office folder).  OneNote® can be used by anyone to organize personal information, by parents to organize family information, by entrepreneurs to record ideas, by researchers to capture web pages and to footnote information, and by employees to create agendas, scribe meeting minutes, summarize meeting minutes, and much more.

Mastering OneNote® helps you organize work/life artifacts.  Delegating the work to OneNote®, not only produces more reliable and higher quality results than our brains can produce, but also allows you to sleep deeper so that you can play harder.

Personally, OneNote® can help you stay organized by managing your passwords, emergency contact information, favorite recipes, entrepreneurial ideas, and more.  Professionally, OneNote® improves the speed at which you can, for example, prepare agendas for meetings, summarize and Email meeting results, and retrieve information after long periods of time.

Information in OneNote® is automatically saved!  That's right; there is no need for a save icon.  If you put content on the page (i.e., by typing text or inserting a file), you can simply "x out of the window" without having to save what you typed.  When you reopen OneNote®, everything you put on the page is still there!

Sharing OneNote® files on the internet or your shared network allows synchronization with your local drive.  This can be a great feature if you use a laptop on the go.  Synchronization occurs automatically when you connect to the same network as the shared OneNote® file.

OneNote® is a jewel of an application, and if you subscribe to my blog, in the weeks ahead, I'll teach you all you need to know to relax at home, and perform like a star at work.

Please subscribe to this blog, and post a comment to share your feedback or request future topics on this subject.