OneNote tags are little symbols you place next to content on your pages in order to characterize your information. Tags are not just cute; they are useful. OneNote uses tags in clever ways to help you organize and find the information you need.
With your initial installation of OneNote, you are provided a pull-down list of tags which you can find in the Tags section of the Home menu.
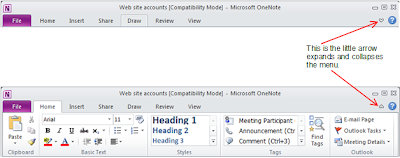
Tip: If your menu bar is not expanded, you can expand it by clicking the little down arrow that appears in the upper-right corner of your OneNote window. Clicking the arrow works like a toggle to expand and collapse the menu bar. See Figure 1, below, for an illustration of a collapsed menu, the arrow that expands the menu, an expanded menu, and the arrow that collapses the menu.
 |
| Figure 1 |
I prefer to keep my menu bar expanded because I have a monitor with plenty of real estate; however, if you use OneNote on a small screen, you may want to keep your menu collapsed.
The initial pull-down list of tags that come with a fresh install of OneNote does not allow me to be as productive as I can be with a more customized list of tags. Fortunately, OneNote provides the option to customize your tag list.
If you don’t already have a list of tags that are proven to work great for you, I suggest you create one right away. See Figure 2, below, for an illustration of my custom tags.
This set of tags should prepare you for the journey of Mastering OneNote, especially if you facilitate meetings.
In order to setup your tags like mine, I recommend you start by deleting all the tags in your current Tags list. You can delete them by selecting the “Customize Tags…” item from the pull-down list of tags in the Tags section of the Home menu; then, select the “X” to delete one item at a time until all except the last item is deleted. When you get down to the last item, simply select either the <Modify Tag…> button and modify the Display Name and Symbol to bottom tag on My Custom Tags list.
NOTE: When you add new tags to your list (i.e., from My Custom Tags list), the new tag is inserted at the top of your list. This means if you start adding tags to you list by working from the top to bottom of my list, our lists will be in opposite order when you're done. Create the same by starting at the bottom of my list, and adding all the other tags, one at a time, using the <New Tag…> button. Continue until your tag list looks just like mine.
As a side note, for improved readability, I avoid using the Font Color or the Highlight Color feature.
Keep in mind that tags are like stamps. When you tag information, an instance of the tag, including its display name, are attached to that information.
NOTE: When you tag content, the symbol is visible, but ironically, the display name is not.
The tag and the tag's display name will not change unless you delete the tag. Tagging content and then later changing the display name can cause issues when you start grouping content by tag name. (i.e., This will result in multiple occurrences of the same symbol with different tags.) For this reason, it is good practice to settle on a list of custom tags when you first start using OneNote.
Later, you may find that you want to tweak the tags more to fit your business/personal needs. To do that, simply select the tags you want to use, and give whatever Display Name you wish.
Overall, there are 138 tags available in OneNote 2010. See Figure 3, below, for a screen clipping of all tags available in OneNote 2010.
 |
| Figure 3 |
There are two easy ways to tag your content.
- Select any tag from the pull-down of the Tags menu; or,
- Hold <Ctrl> key, and press a number from 1 through 9.
NOTE: The first nine (9) tags in the Tags list, can be used with the <Ctrl> key to apply the corresponding tag. Put your most frequently used tags in the top 9 of your tags list, and don't change the order.
Use your tags to identify your content. Then, you can put your tags to work for you. You can summarize content based on your tags, to produce new useful information.

No comments:
Post a Comment