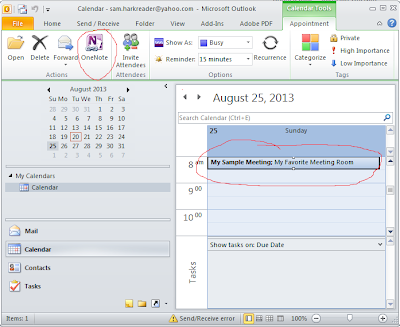
OneNote and MS-Outlook are well integrated. In order to launch OneNote and create a page from an MS-Outlook event, select (single click) an MS-Outlook event on your calendar; then, select the OneNote icon. Figure 1, below, is a screen clip of an outlook calendar on August 25, 2013. I used a red pen to circle the OneNote icon and a meeting event titled "My Sample Meeting".
 |
| Figure 1 |
 |
| Figure 2 |
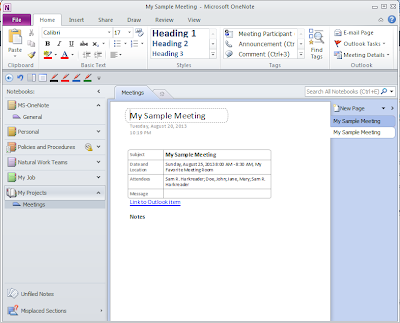
You may notice that the Attendee names are in a string, delimited by semi-colons. You can manually convert this string into a single column list by manually deleting the semi-colons and hitting the <Return> to put the next name on the next line. Afterwards, select the entire list of names and press <Ctrl>+1. This will add a "Participant" tag to each attendee on the list.
You also need to replace the "Message" row of the header with two new rows: the "Purpose" row, and the "Desired Outcomes" row. To do this, simply edit the "Message" label to say "Purpose". Tab to the next field and type the purpose of the meeting. Tab again to add another row; there, type the ""Desired Outcome(s)" label. Tab again to type the desired outcome(s) of the meeting.
You may have noticed that the font of the "Desired Outcome(s)" label looks a bit different from the others. I fix this with the format painter icon. (i.e., Select the "Subject" header and click the Format Painter icon from the top left of the menu bar; then select the "Desired Outcomes" label. Doing so, will cause the "Desired Outcome(s)" label to match the "Subject" label.)
Now that you have the header of the agenda created, you can create the body. Once you create your first Agenda table, you can easily copy to another future agenda page and edit it for the new meeting. I always leverage previous work where I can.
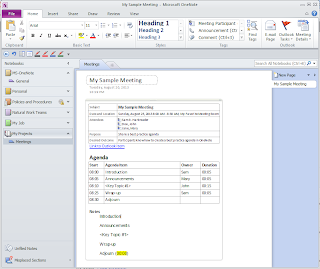
In order to create your first agenda table, just type the word "Agenda", and change the font to something like 16 pt. Bold Calibri as I did in figure 2, below.
You'll need to hit enter to go to the next line where you will insert the table. To insert the table, simply select the "Insert" menu item near the top of the window. From there, use the table feature to insert a table that is four columns wide and six columns tall. In the first row, type the headers to match the headers in my Agenda table ("Start", "Agenda Item", "Owner", and "Duration"). I bold my header, and I recommend you do the same. Now fill out the table to match mine.
 |
| Figure 3 |
Now that the Agenda table is complete, let's finish with the Note section. First, let's create a heading for the Notes section. In my example above, I just bolded the default text, but you may want to make the style match the "Agenda" heading (16 pt. bold Clibri).
In order to copy and paste only the text, I'll use MS-Notepad to strip the table formatting. I'll explain how.
- Hover near the top border of the table, above the "Agenda Items" column until you see the down arrow.
- With the down arrow showing, press your right mouse button and select copy, to copy the contents of the column to your clipboard.
- Open MS-Notepad and paste the contents into the MS-notepad window.
- Delete the text that says "Agenda Items" since that's not actually an agenda topic.
- Copy the rest and then paste it under the Notes section on your OneNote page.
I like to put an extra line or two between each item in the Notes section so that I'm even more ready to type content when the meeting starts. In fact, I even add a tab to the line below the agenda item so that when I start typing, the content is already indented.
Remember to leverage work where you can. If you have standing meetings, there is typically much content that can be re-used. Consider copying parts of the page from previous meetings to the page of your current meeting, and edit only the parts that require change. OneNote is great about allowing you to copy tables or parts of tables from one page to another.
In future posts, I'll share some productivity tools/tips to help you quickly convert the Attendee names to a single column of names, and to calculate the start time column automatically. In future posts, I will also share practices for note taking, so stick around.
No comments:
Post a Comment